
DIY Mini Resin Art Lake Maps
- Heather Miller

- Jan 13
- 3 min read
Updated: Jan 16

One of my family members is always hard to shop for - they like to go fishing, hunting, and other outdoor activities, but I can only buy a Cabela's gift card so many times before it gets boring as a gift. After thinking about possible gifts that I could make, I had a thought to make coasters of their favorite fishing holes in the local area. I've made layered lake maps out of wood and glass in the past, but how would I make small, 3 inch coasters? The answer is: with epoxy resin and vinyl.

Below is a step-by-step guide for anyone else who wants to create lake coasters like these. Many of the materials I had on hand already, but I'll provide links to procure them yourself:
Materials:
Crystal Clear 2 part epoxy resin ($17.99 at Amazon)
3" coaster molds ($3.49 at Hobby Lobby)
Blue matte vinyl ($4.99 at Hobby Lobby)
Printable vinyl ($12.99 at Michaels)
Ink-Jet Transparency sheet ($6.99 at Amazon)


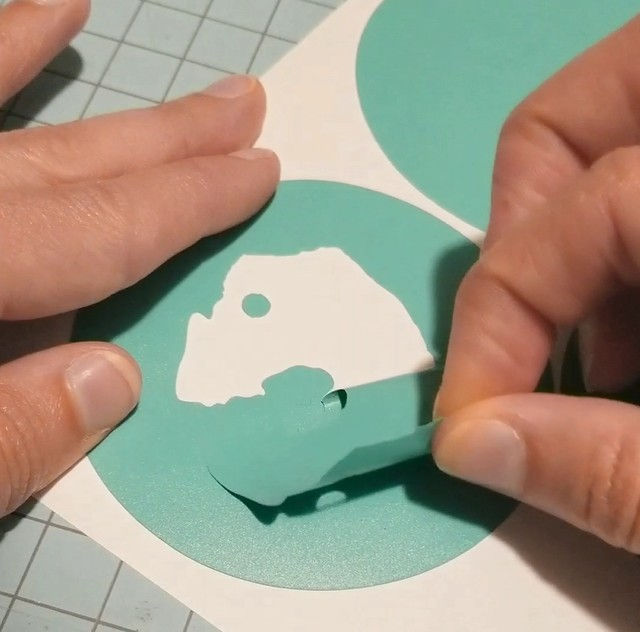
Create cut files on computer. I used Adobe Illustrator to create the art, and separated each layer to fit into a 3" diameter circle. I then arranged all of the cut lines and exported as a .dxf file for my electronic paper cutter to cut out in Silhouette Studio (Blade depth: 2; Force: 16; Speed: 4; Passes: 1). Something important I did that helps majorly later on: I added a single cut line at the very top of each circle. This helps to line up all the layers correctly.

Cut out circles from blue vinyl. The first layer is a solid blue circle with no cuts on the interior.

Peel layer 1 and attach to the bottom of the coaster mold. I added a small sharpie line on one edge of the coaster to denote the "top". This is where that thin cut line will line up for all subsequent layers.

Add 10 mL of 2 part epoxy resin. Ensure that the resin remains clear of bubbles, dust, and stray hairs while it hardens over the course of 24 hours. (A heat gun can help to pop bubbles) *NOTE when working with resin: 🥽 Always work in a well-ventilated area and use safety goggles, a respirator, and gloves.

Peel layer 2 and line up the top cut with the sharpie mark we made earlier. Make sure to apply smoothly so no bubbles are trapped beneath the vinyl. Add 10mL of resin to this layer and wait 24 hours for it to harden.
Since layer 3 has a land mass separate from the main cut, I added transparency tape over the top of the circle to keep it in the correct placement when applying to the coaster. Peel up and apply to the coaster, lining up the top cut with the sharpie mark on the mold.

Repeat step 5 for layer 3.

For layer 4, I like to use a wooden texture for the surface, so I printed it on printable vinyl with additional rivers and points of interest included. Add epoxy resin, and before it hardens complete step 9:

With ink-jet printable transparency film, print the text that will be displayed over the top of the layers. This calls out points of interest, a compass, the titles of various landmarks, and the deepest point of the lake. Add this film over the top of layer 4's wet resin, and make sure no bubbles are trapped underneath the film. If there are, simply remove them by squeezing the transparency film from the center to the edge. Once those bubbles are removed, add epoxy resin above this film, remove bubbles with a heat gun, and allow to harden over 24 hours.

After all of these layers have been hardened, it's time to remove it from the mold. Since I turned these into coasters, I added adhesive felt to the bottom. However, you can also turn these into refrigerator magnets by gluing a strong magnet to the back.
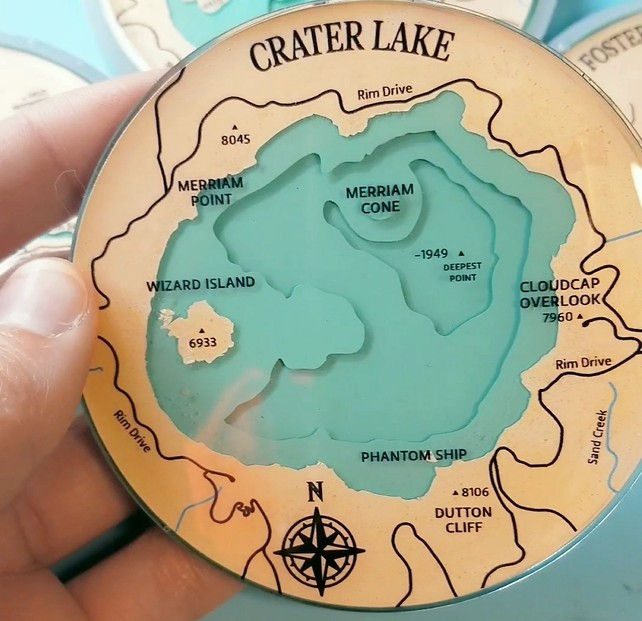
And it's done! I created a few different lakes and made them into a set, complete with the coaster holder. And of course, the gift was a hit and the giftee loved them! Their comment was "they're too good to use as real coasters" haha

Below is a video of my process:
Thanks for reading! Follow me on social media (🦋 Bluesky | 📸 Instagram | 🐦 Twitter) Or feel free to support me at any of these sites:


Comments